
 By zynmag
Introduction: Why Seam Knowledge Transforms Your Sewing
Every skilled sewer understands that choosing the right seam type makes an enormous difference in any finished garment or project. Nahttypen, the German term for seam types, encompasses the entire fascinating world of stitching methods that hold fabric pieces together beautifully. Furthermore, understanding different seam varieties helps sewers make smarter construction decisions that improve both appearance and structural durability significantly. Additionally, the wrong seam choice can cause puckering, fraying, weakness, or an unprofessional finish that undermines hours of careful careful work. Therefore, investing time in learning the full range of available seam options pays enormous dividends across every sewing project you undertake. Moreover, professional tailors and fashion designers rely on specific seam selections to achieve the precise results their high-quality work demands consistently. Consequently, building genuine seam knowledge elevates your sewing from amateur hobbyist level toward genuinely skilled and confident craftsmanship.
Understanding the Fundamentals of Seam Construction
What Exactly Defines a Seam
A seam joins two or more fabric pieces together along a stitched line that holds the construction firmly and reliably. Specifically, every seam consists of a stitch line, seam allowance, and some form of edge finishing that prevents fabric from unraveling over time. Furthermore, seam allowance refers to the fabric distance between the cut edge and the actual stitching line running parallel beneath it. Additionally, standard seam allowances vary between five millimeters and twenty-five millimeters depending on the garment type, fabric, and construction method involved. Therefore, understanding seam allowance before cutting any fabric prevents costly mistakes that waste precious material and valuable crafting time. Moreover, different garment categories traditionally use different standard allowances, with formal tailoring generally requiring more generous allowances than casual or stretch garments do. Consequently, reading pattern instructions carefully before beginning any project ensures you cut accurate allowances that support your chosen construction approach effectively.
The Role of Seam Choice in Garment Quality
Seam selection profoundly influences the durability, appearance, comfort, and overall quality of any finished sewn item. Specifically, a beautifully constructed garment with poorly chosen seams will fail prematurely despite excellent fabric selection and careful cutting. Furthermore, seam type affects how a garment drapes, moves, and feels against the wearer’s body during everyday use. Additionally, visible seams on outerwear or decorative items contribute actively to the aesthetic character of the finished piece’s overall design. Therefore, considering both functional and aesthetic seam requirements before beginning construction leads to significantly better and more satisfying finished results. Moreover, experienced sewers develop an intuitive sense for matching seam types to specific fabric behaviors and garment construction requirements over time. Consequently, building this intuitive knowledge through deliberate practice and experimentation accelerates your development as a genuinely skilled and versatile sewing practitioner.
The Plain Seam: The Foundation of All Sewing
Construction and Basic Application
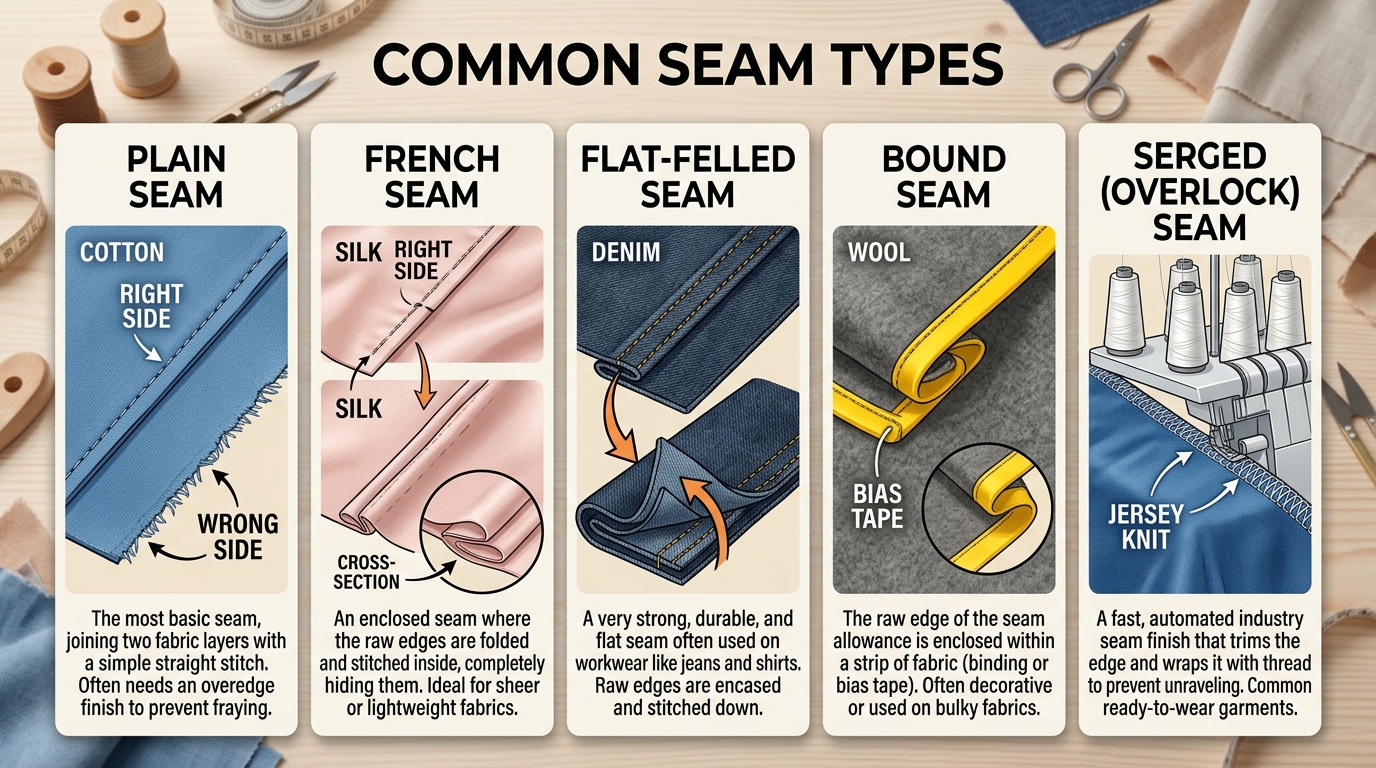
The plain seam represents the most fundamental joining method in sewing and appears in virtually every type of sewn project imaginable. Specifically, sewers place two fabric pieces together with right sides facing and stitch along the seam line at the specified allowance width. Furthermore, pressing the seam allowances open or to one side after stitching creates a flat, neat finish that supports clean garment construction. Additionally, this straightforward seam works beautifully on medium-weight woven fabrics like cotton, linen, and stable interfaced materials. Therefore, mastering the plain seam with consistent stitch length and tension provides the essential foundation for learning every more advanced seam variation. Moreover, even professional tailors use this basic joining method constantly because its simplicity and reliability make it genuinely indispensable across all construction contexts. Consequently, sewers who execute plain seams with precision and care already possess the core technical skill underlying most professional garment construction techniques.
Finishing the Plain Seam Properly
An unfinished plain seam frays aggressively during washing and wearing, eventually compromising the entire garment’s structural integrity and appearance. Specifically, sewers can finish plain seam allowances using several effective methods depending on their available equipment and fabric type. Furthermore, a zigzag stitch along each raw edge prevents fraying on most woven fabrics without requiring any specialized equipment beyond a basic sewing machine. Additionally, an overlocker or serger creates the most professional and durable seam finish available, neatly encasing the raw edge in thread. Therefore, sewers who own an overlocker should develop the habit of finishing all seam allowances immediately after stitching each seam during construction. Moreover, pinking shears offer a quick alternative finishing method that works adequately on tightly woven fabrics that fray minimally during use. Consequently, choosing the most appropriate finishing method for your specific fabric and project requirements prevents frustrating deterioration of otherwise beautifully constructed garments over time.
The French Seam: Elegance and Enclosed Perfection
Why Sewers Love the French Seam
The French seam stands as one of the most beautifully elegant construction techniques available to anyone who sews with sheer or delicate fabrics. Specifically, this method completely encloses both raw edges within the seam itself, creating an impeccably neat finish visible from both fabric sides. Furthermore, delicate fabrics like chiffon, silk organza, and fine lawn benefit enormously from this technique because it handles them with great gentleness. Additionally, the finished French seam appears as a narrow, clean tuck on the wrong side that requires absolutely no additional finishing treatment whatsoever. Therefore, sewers working with transparent or semi-transparent fabrics should always consider this technique because interior seams remain clearly visible through the fabric. Moreover, heirloom sewing, bridal wear, and fine lingerie construction frequently rely on this technique to achieve impeccable interior finishing standards throughout.
Step-by-Step French Seam Construction
Constructing a successful French seam requires working in two distinct stages that together create the perfectly enclosed finished result. Specifically, begin by placing fabric pieces with wrong sides together, which reverses the usual plain seam starting position deliberately. Furthermore, stitch a narrow seam of approximately six millimeters along the seam line and trim the allowance to approximately three millimeters carefully. Additionally, press this initial seam to one side before folding the fabric so right sides now face each other correctly along the seam. Therefore, stitch a second seam of approximately six to eight millimeters that completely encloses the first trimmed seam allowance within it. Moreover, pressing this final seam creates the characteristic neat ridge that defines a properly executed French seam on any garment. Consequently, practicing this two-stage technique on fabric scraps before attempting it on a real project builds confidence and accuracy that produces reliably beautiful results.
The Flat-Felled Seam: Strength Meets Style
Where Flat-Felled Seams Appear
The flat-felled seam appears most famously along the side seams and inseams of quality denim jeans worldwide without exception. Specifically, this seam type creates two parallel rows of visible topstitching on the right side that become a deliberate design element. Furthermore, the construction method folds one seam allowance over the other and topstitches it flat against the fabric, creating exceptional strength. Additionally, this technique produces a completely flat, smooth seam with no protruding edges that might cause irritation against sensitive skin during wear. Therefore, activewear, workwear, children’s clothing, and denim garments all benefit enormously from the superior durability this construction method delivers. Moreover, the visible topstitching creates a characteristic aesthetic that many designers intentionally incorporate as a recognizable stylistic feature in their work.
Constructing the Flat-Felled Seam
Building a flat-felled seam requires careful pressing and precise folding that rewards patient and methodical sewers with outstanding results. Specifically, begin with a standard plain seam, then press both seam allowances to one side away from the center. Furthermore, trim the lower seam allowance to approximately half its original width to reduce bulk within the felled portion. Additionally, fold the upper full-width allowance over the trimmed lower one and press the fold flat with a hot iron and pressing cloth. Therefore, pin or baste the folded allowance flat against the garment fabric before topstitching carefully along the folded edge. Moreover, sewing a second parallel row of topstitching along the original seam line completes the characteristic double-stitched appearance that defines this seam type.
The Lapped Seam: Practicality in Leather and Non-Woven Materials
Understanding the Lapped Seam’s Purpose
The lapped seam offers a uniquely practical solution for materials that fray excessively or behave very differently from standard woven fabrics. Specifically, leather, suede, felt, and heavy interfacing all benefit from this technique because these materials require no seam allowance finishing whatsoever. Furthermore, this method overlaps one fabric edge directly over the other and stitches through both layers simultaneously in a single pass. Additionally, the resulting seam lies completely flat without any folded allowances creating bulk underneath the stitching line above. Therefore, leather garments almost exclusively use this technique because the material does not fray and handles beautifully without enclosing raw edges. Moreover, reducing bulk in heavy materials like thick wool or multiple interfacing layers makes the lapped seam invaluable in tailoring and structured garment construction.
Variations on the Lapped Seam
Several interesting variations of the basic lapped approach offer additional creative and functional possibilities across different material types. Specifically, the slot seam variation inserts a contrasting fabric strip beneath a gap between two fabric edges to create decorative effect. Furthermore, this design variation appears frequently in sportswear and contemporary fashion where visible construction details contribute actively to aesthetic character. Additionally, sewers working with vinyl or coated fabrics favor lapped seams because these materials show needle holes permanently when stitching gets repositioned. Therefore, planning lapped seam placement carefully before sewing prevents the irreversible needle-hole problems that plague vinyl and coated fabric projects.
The Welt Seam: Professional Tailoring Distinction
What Defines a Welt Seam
The welt seam appears most frequently in professional tailoring and creates a distinctive raised ridge on the right side of the fabric. Specifically, this technique involves pressing both seam allowances to one side and topstitching them flat from the right side of the fabric. Furthermore, the resulting visible stitching line runs parallel to the seam and creates a characteristic shadow line that adds visual depth. Additionally, tailored jackets, trousers, and structured coats frequently feature welt seams along specific construction lines for both practical and aesthetic reasons. Therefore, the technique suits medium to heavy fabrics beautifully because lighter materials often lack the body needed to support the raised effect. Moreover, single welt and double welt variations offer different visual weights and decorative emphasis depending on the specific design intention.
Executing the Welt Seam With Precision
Precise pressing and consistent topstitching distance determine whether a welt seam looks genuinely professional or merely amateur in execution. Specifically, stitch the initial plain seam and then press both allowances firmly toward the intended welt side using a hot iron. Furthermore, from the right side, topstitch through all fabric layers at a consistent distance from the seam line, typically six to eight millimeters away. Additionally, maintaining completely consistent stitching distance throughout the entire seam length requires slow, controlled machine sewing with frequent visual checks. Therefore, using a quilting guide foot or seam guide attachment on your sewing machine ensures perfectly consistent topstitching distance across every centimeter. Moreover, thread color choice significantly affects the visual impact of the welt, with matching thread creating subtlety and contrasting thread creating bold design emphasis.
Specialty Seams for Stretch and Knit Fabrics
Why Stretch Fabrics Demand Different Seam Approaches
Standard straight-stitch seams snap and break immediately when sewn into stretchy knit fabrics and then stretched during wear. Specifically, jersey, spandex, ribbing, and other knit fabrics require seam types that stretch along with the fabric rather than resisting movement. Furthermore, choosing a stretch-compatible seam type prevents the frustrating thread breakage that ruins otherwise beautifully constructed activewear and casual knit garments. Additionally, modern sewing machines offer several built-in stretch stitch options specifically designed for joining knit and elastic fabric types effectively. Therefore, always selecting a stretch-appropriate stitch setting before sewing any seam on knit fabric prevents construction failures that waste both time and materials. Moreover, a serger or overlocker handles knit fabrics particularly brilliantly by simultaneously trimming, joining, and finishing the seam in one efficient pass.
The Lightning Bolt and Stretch Stitch Options
Modern sewing machines offer several built-in stitch options that handle stretch fabric seams with genuine effectiveness and reliability. Specifically, the lightning bolt stitch creates a zigzag pattern forward and backward that gives seams the necessary elasticity for comfortable garment movement. Furthermore, the narrow zigzag stitch at two millimeters wide also works well for lighter knit fabrics that require only modest stretch in seams. Additionally, the three-step zigzag distributes stretch stress across multiple thread points rather than concentrating it at single needle penetration points. Therefore, testing different stretch stitch options on fabric scraps before committing to your actual garment seams helps identify which option suits your specific fabric best.
Decorative Seams That Add Visual Interest
The Exposed Seam as Design Feature
Contemporary fashion frequently celebrates exposed seams as deliberate design features rather than hiding them as construction necessities. Specifically, raw edge seams sewn on the outside of a garment create an industrial, edgy aesthetic popular in contemporary streetwear and avant-garde fashion design. Furthermore, using contrasting thread colors on exposed seams transforms purely functional stitching into prominent decorative embellishment that draws deliberate visual attention. Additionally, the exposed seam approach works particularly effectively on stable fabrics like denim, canvas, and densely woven wool that fray minimally and slowly. Therefore, allowing controlled fraying along exposed raw edges creates a deliberately casual, lived-in aesthetic that many contemporary designers actively pursue. Moreover, finishing exposed seams with hand stitching or decorative machine embroidery elevates them from rough industrial to refined artisanal in their overall character.
Pin Tucks and Decorative Topstitching
Pin tucks and decorative topstitching transform functional seam lines into beautiful design details that add visual texture and dimension. Specifically, pin tucks involve stitching very narrow folds of fabric that create raised ridges arranged in deliberate parallel patterns across fabric sections. Furthermore, rows of pin tucks on bodice fronts, sleeves, and yokes represent a classic tailoring embellishment that demonstrates exceptional sewing skill and patience. Additionally, decorative topstitching in contrasting or metallic thread along seam lines adds color accent and visual emphasis that draws the eye deliberately. Therefore, planning decorative topstitching placement during the design stage rather than adding it as an afterthought produces more intentional and cohesive finished results. Moreover, combining pin tucks with contrasting topstitching creates multi-layered visual interest that elevates even simple garment silhouettes into genuinely distinctive fashion statements.
Troubleshooting Common Seam Problems
Addressing Puckering and Tension Issues
Seam puckering frustrates sewers at every skill level and almost always results from incorrect machine tension or inappropriate stitch length settings. Specifically, puckering occurs when thread tension pulls the fabric into tiny gathers along the seam line during or immediately after stitching. Furthermore, reducing upper thread tension slightly and lengthening the stitch often resolves persistent puckering on lightweight and delicate fabric types. Additionally, using the correct needle size for your specific fabric weight prevents the puncture damage that causes puckering in fine or delicate materials. Therefore, always testing your machine settings on fabric scraps before beginning any actual project seam prevents wasted effort and material frustration.
Fixing Seam Alignment Problems
Misaligned seams create visible construction flaws that undermine the professional appearance of otherwise carefully made garments and projects. Specifically, pinning fabric pieces together thoroughly before sewing prevents the shifting that causes alignment problems during the actual stitching process. Furthermore, using fabric clips instead of pins on thick or delicate materials that pin marks might damage permanently prevents alignment-related construction problems effectively. Additionally, matching notches, pattern marks, and seam intersection points carefully before pinning ensures that pattern pieces align correctly throughout the joining process. Therefore, basting difficult seams by hand or with a long machine stitch before final stitching allows you to check alignment without committing to permanent construction. Moreover, working slowly around curves and corners while lifting the presser foot frequently to realign fabric prevents the drift that causes seam misalignment in complex construction areas.
Conclusion: Master Seam Types and Transform Your Sewing
Understanding and applying the full range of available seam types genuinely transforms the quality, durability, and creative possibilities of everything you sew. Furthermore, each technique you master adds another valuable tool to your sewing toolkit that you reach for instinctively in appropriate construction situations. Additionally, the relationship between fabric type, garment purpose, and seam selection becomes increasingly intuitive as your practical experience accumulates over time. Therefore, deliberately practicing each seam type on fabric samples before you need them in actual projects builds genuine confidence and reliable skill. Moreover, the world of seam construction continues evolving as new materials, sewing machines, and fashion directions create fresh technical challenges and exciting opportunities. Consequently, staying curious and continuing to experiment with different techniques keeps your sewing knowledge current, relevant, and constantly growing.